Difference between revisions of "Rear Axle/Differential R&R"
| Line 15: | Line 15: | ||
1.- Remove the axle shaft dust caps. Lossen the wheel nuts. | 1.- Remove the axle shaft dust caps. Lossen the wheel nuts. | ||
| + | |||
2.- Raise the rear of the vehicle and place it on jackstands. | 2.- Raise the rear of the vehicle and place it on jackstands. | ||
| + | |||
3.- Drain the axle housing. | 3.- Drain the axle housing. | ||
| + | |||
4.- Remove the axle cover. | 4.- Remove the axle cover. | ||
| + | |||
5.- Remove the wheels, brake drums, hubs, axel shaft and seals. Keep the axel parts separated according to the side of the vehicle from which they were removed. | 5.- Remove the wheels, brake drums, hubs, axel shaft and seals. Keep the axel parts separated according to the side of the vehicle from which they were removed. | ||
| + | |||
6.- Mark the bearing caps with a centerpunch for reassembly reference. | 6.- Mark the bearing caps with a centerpunch for reassembly reference. | ||
| + | |||
7.- Loosen the bearing cap bolts until only a few threads remain engaged. Pull caps away from bearings. This will prevent the differential assembly from falling out in set 8. | 7.- Loosen the bearing cap bolts until only a few threads remain engaged. Pull caps away from bearings. This will prevent the differential assembly from falling out in set 8. | ||
| + | |||
8.- Pry the differential loose in the axle housing with a pry bar. | 8.- Pry the differential loose in the axle housing with a pry bar. | ||
| + | |||
9.- Remove the bearing caps. remove the differential assembly. | 9.- Remove the bearing caps. remove the differential assembly. | ||
| + | |||
10.- Tie the bearing shims to their respective caps and cups to prevent them from being mixed up or misplaced. | 10.- Tie the bearing shims to their respective caps and cups to prevent them from being mixed up or misplaced. | ||
| + | |||
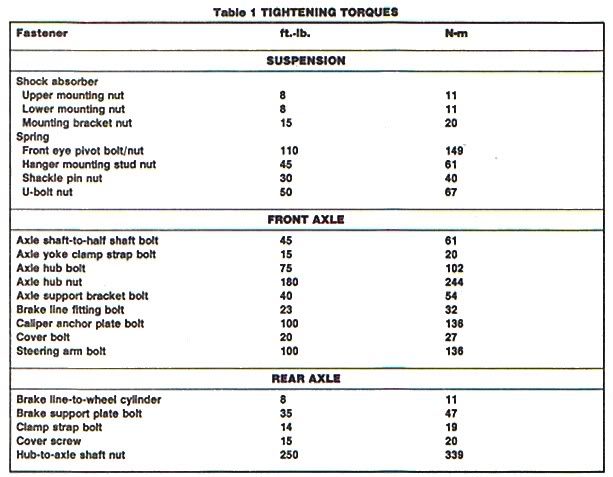
11.- Installation is the reverse of removal. tighten all fasteners to specifications. | 11.- Installation is the reverse of removal. tighten all fasteners to specifications. | ||
http://img.photobucket.com/albums/v198/Gilspix/AMC%20Diagrams/Differentialtable1.jpg | http://img.photobucket.com/albums/v198/Gilspix/AMC%20Diagrams/Differentialtable1.jpg | ||
Revision as of 04:26, 21 July 2006
1980-1983 AMC Eagle's
The Differential repair requires special skills and specialty tools.
The inspection procedures will tell if repairs are necessary.
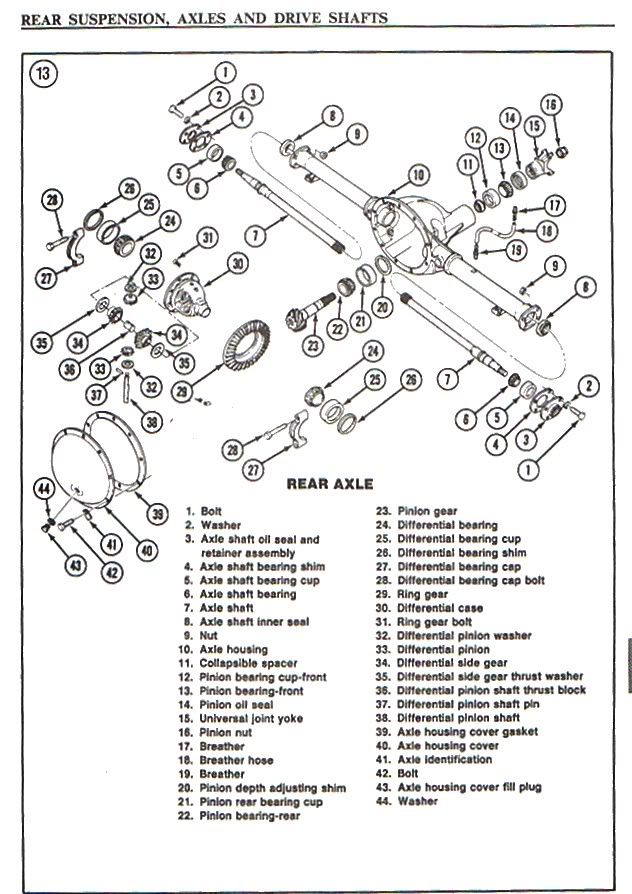
http://img.photobucket.com/albums/v198/Gilspix/AMC%20Diagrams/Differentialfigure13.jpg
The differential can be checked and overhauled without removing the rear axle assembly.
Refer to Figure 13 for part names and location.
1.- Remove the axle shaft dust caps. Lossen the wheel nuts.
2.- Raise the rear of the vehicle and place it on jackstands.
3.- Drain the axle housing.
4.- Remove the axle cover.
5.- Remove the wheels, brake drums, hubs, axel shaft and seals. Keep the axel parts separated according to the side of the vehicle from which they were removed.
6.- Mark the bearing caps with a centerpunch for reassembly reference.
7.- Loosen the bearing cap bolts until only a few threads remain engaged. Pull caps away from bearings. This will prevent the differential assembly from falling out in set 8.
8.- Pry the differential loose in the axle housing with a pry bar.
9.- Remove the bearing caps. remove the differential assembly.
10.- Tie the bearing shims to their respective caps and cups to prevent them from being mixed up or misplaced.
11.- Installation is the reverse of removal. tighten all fasteners to specifications.
http://img.photobucket.com/albums/v198/Gilspix/AMC%20Diagrams/Differentialtable1.jpg