Difference between revisions of "Alternator Belt"
| Line 3: | Line 3: | ||
This topic is for cars with Air Conditioning. | This topic is for cars with Air Conditioning. | ||
| − | + | To change this belt you will need to first remove the belt which goes to the A/C compressor. You will need a 5/8 socket wrench or 5/8" box wrench and a 1/2" breaker bar to adjust the belt when you replace it. | |
| − | + | Tools needed: 9/16" box wrench, 9/16" socket wrench and a pry bar that will fit in the bottom adjusting slot. A 9/16" rachet wrench will work on some of the fasteners but not all given clearance issues. | |
| − | Loosen the alternator bracket adjusting bolt. | + | From underneath the car, loosen the altnernator bracket lower pivot screw (see picture) best if you use a 9/16" box wrench. |
| + | |||
| + | Loosen, if equipped, the idler pulley attaching bolt with your 9/16" box wrench (not pictured -- on the back side in-line with the idler). You may need to put a 9/16" socket wrench on the idler attaching nut to loosen. | ||
| + | |||
| + | Loosen the upper alternator bracket adjusting bolt from above with your 9/16" box wrench. | ||
Adjust alternator using a suitable pry bar. Insert pry bar through hole on bottom of bracket. | Adjust alternator using a suitable pry bar. Insert pry bar through hole on bottom of bracket. | ||
| − | When adjusted to desired tension tighten adjusting bolt. | + | When adjusted to desired tension tighten the bottom pivot bolt and then idler pully attaching bolt -- you will also need to use your 9/16" socket wrench to hold the idler pulley attaching nut to fully tigthen this bolt. |
| + | |||
| + | Tighten top adjusting bolt. | ||
Check tension and adjust if needed. | Check tension and adjust if needed. | ||
Revision as of 19:48, 4 June 2006
Alternator Belt
This topic is for cars with Air Conditioning.
To change this belt you will need to first remove the belt which goes to the A/C compressor. You will need a 5/8 socket wrench or 5/8" box wrench and a 1/2" breaker bar to adjust the belt when you replace it.
Tools needed: 9/16" box wrench, 9/16" socket wrench and a pry bar that will fit in the bottom adjusting slot. A 9/16" rachet wrench will work on some of the fasteners but not all given clearance issues.
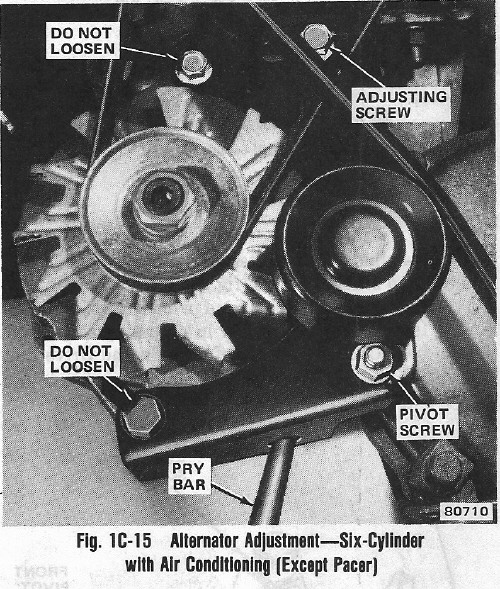
From underneath the car, loosen the altnernator bracket lower pivot screw (see picture) best if you use a 9/16" box wrench.
Loosen, if equipped, the idler pulley attaching bolt with your 9/16" box wrench (not pictured -- on the back side in-line with the idler). You may need to put a 9/16" socket wrench on the idler attaching nut to loosen.
Loosen the upper alternator bracket adjusting bolt from above with your 9/16" box wrench.
Adjust alternator using a suitable pry bar. Insert pry bar through hole on bottom of bracket.
When adjusted to desired tension tighten the bottom pivot bolt and then idler pully attaching bolt -- you will also need to use your 9/16" socket wrench to hold the idler pulley attaching nut to fully tigthen this bolt.
Tighten top adjusting bolt.
Check tension and adjust if needed.
Tighten adjusting bolt to 18 foot pounds; mounting bolts to 28 foot pounds and back idler to 33 foot pounds.
